5 Best Drip Irrigation Kits for Container Gardens

Keep your container garden watered with less stress with these top-rated drip irrigation kits for container gardens of all sizes…
Key Takeaways:
- Drip irrigation systems can reduce water consumption by up to 70% while improving plant health through consistent moisture delivery
- The best container drip irrigation kits include essential components like pressure regulators, flexible tubing, and appropriate emitters for potted plants
- We review several excellent drip irrigation kits from starter solutions for gardeners with six or fewer containers, to larger scale setups with 20+ containers
- Proper emitter selection is crucial – small containers typically need 0.5 GPH emitters while larger planters may require up to 5 GPH flow rates
- Installing a drip system with a timer can transform container gardening from a daily chore into a mostly hands-off hobby
Container gardening should be a joy, not a burden! Yet many gardeners find themselves chained to their watering cans, especially during hot summer months when containers might need water twice daily. The solution is simpler than you might think.
A properly designed drip irrigation system delivers water directly to your plants’ root zones, transforming your container garden from a water-guzzling time sink into an efficient, thriving garden. With the right kit, you’ll save hours each week while your plants receive precisely what they need to flourish!

Image from www.aliexpress.com.
This comprehensive guide will walk you through everything you need to know about selecting, installing, and maintaining the perfect drip irrigation system for your container garden. We’ll cover the essential components, recommend the best kits on the market, and provide step-by-step installation instructions to ensure your potted plants never go thirsty again – even when you’re away.
Whether you have a few patio pots or an extensive container garden, finding the right drip irrigation solution will revolutionize your gardening experience, giving you healthier plants with less effort and less water waste.
Why Your Container Plants Are Thirsty (Even When You Think They’re Not)
Container plants face unique hydration challenges that garden beds don’t. The limited soil volume in pots means less water retention, creating a boom-and-bust moisture cycle that stresses plants. Even when the surface appears damp, the root zone may be dangerously dry, leading to wilting and poor growth.
Hot weather compounds these issues dramatically. Container soil temperatures can soar 20°F higher than ground soil, accelerating evaporation and increasing plant water needs. During peak summer, some containers may require watering multiple times daily to prevent stress.
The physical limitations of hand-watering exacerbate the problem. Quick passes with a watering can often result in water running down the sides of containers rather than penetrating to root zones. This creates misleading surface moisture while leaving roots parched below, setting up a cycle of chronic underwatering despite your best efforts.
The Game-Changing Benefits of Drip Irrigation for Potted Plants
- Precise water delivery directly to root zones
- Reduced water consumption by eliminating overspray and evaporation
- Consistent moisture levels preventing stress and promoting steady growth
- Automated watering schedules that maintain optimal conditions even during vacations
- Decreased leaf wetness, reducing fungal disease risk
- Scalable systems that grow with your container collection
Drip irrigation transforms container gardening from a daily chore into a mostly automated pleasure. By delivering water slowly and directly to root zones, these systems eliminate the guesswork of hand-watering while dramatically improving plant health. The slow, steady moisture supply promotes deeper root development and more robust growth compared to the feast-or-famine cycle of manual watering.
The true magic happens when you pair your drip system with a timer. Suddenly, your containers receive perfect watering sessions at ideal intervals – whether you’re home or not! Plants thrive with this consistency, and you’ll notice improved flowering, fruiting, and overall vigor within weeks of installation.
Water Conservation: Save Up to 70% Compared to Hand Watering
Traditional watering methods waste significant amounts of water through runoff, evaporation, and overspray. Drip irrigation systems deliver water with surgical precision, reducing consumption by 30-70% compared to hand watering or sprinklers. This targeted approach ensures every drop counts, with water going exactly where plants need it.
Beyond the environmental benefits, this efficiency translates directly to lower water bills. For container gardeners in drought-prone regions or areas with water restrictions, drip irrigation isn’t just convenient – it’s becoming essential. Many water districts now offer rebates for installing water-efficient irrigation systems, making the investment even more attractive.
Water Usage Comparison: 10 Container Plants Over Summer Season
Hand Watering: ~7,500 gallons
Sprinkler System: ~5,200 gallons
Drip Irrigation: ~2,250 gallons
*Based on average container needs during 90-day summer period in temperate climates.
The savings are particularly dramatic for hanging baskets and elevated containers, which typically need more frequent watering and are prone to rapid drying. A properly calibrated drip system can reduce water usage for these challenging containers by up to 80% while improving plant performance.
For more information on optimizing water usage in urban settings, check out this article on efficient water management systems.
Plant Health Improvements from Consistent Moisture
Container plants thrive on consistency, and nothing delivers moisture more reliably than a well-designed drip system. By maintaining optimal soil moisture levels, drip irrigation prevents the damaging cycle of drought stress and overwatering that plagues many container gardens. Roots develop more extensively in evenly moist soil, improving nutrient uptake and overall plant resilience.
Perhaps the most visible benefit comes in disease prevention. Traditional overhead watering wets foliage, creating ideal conditions for fungal pathogens like powdery mildew and leaf spot. Drip irrigation keeps leaves dry while hydrating roots, dramatically reducing disease pressure without chemical interventions. This benefit alone makes drip systems worthwhile for gardeners struggling with recurring plant health issues.
1. Raindrip R560DP Automatic Container and Hanging Baskets Kit

Image from www.ebay.com.
The Raindrip R560DP kit is celebrated for its ease of setup and user-friendly timer. The waterproof timer connects seamlessly to a standard faucet and runs on AA batteries, eliminating the need for an outlet or complex installation. Many users report assembling and programming the system in under 20 minutes, making it incredibly accessible even for gardening novices.
Additionally, you can water up to 20 containers or hanging baskets simultaneously, thanks to 75 ft of tubing and twenty ½ GPH pressure-compensating drippers — a setup ideal for medium-sized patios or balcony gardens. The precision drip system also promotes water savings (up to 70% less water than sprinklers) while delivering moisture slowly and evenly to the soil .
For gardeners seeking an affordable, no-fuss drip system, the Raindrip R560DP is a great pick. It blends value, convenience, and effectiveness—perfect for watering pots, baskets, or small raised beds. As one reviewer aptly put it:
For under $40, it offers a compelling mix of automation and efficiency—ideal for spring and summer gardening in zones like hot, dry patios or shaded suburban porches.
2. Orbit 69525 Micro Bubbler Drip Irrigation Kit

Image from www.amazon.com.
The Orbit 69525 stands out for its versatility with larger containers, especially planters that need more water distribution than a single dripper can provide. Its micro-bubbler emitters create a gentle 360° spray pattern that covers the entire soil surface in medium to large containers. This system excels for established plants with broader root systems, where water distribution across the entire soil volume is critical for optimal growth.
Installation is remarkably straightforward with color-coded components and pre-assembled sections that snap together without tools. The kit includes 50 feet of flexible tubing, 12 adjustable micro-bubblers, and all necessary fittings to water up to a dozen containers. Its pressure regulator handles municipal water pressure exceptionally well, preventing blown connections even in high-pressure systems.
3. Rain Bird DRIPPAILQ Drip Irrigation Kit for Beginners

Image from www.amazon.com.
Rain Bird’s DRIPPAILQ kit deserves special mention for its approachability and excellent documentation. It arrives in an actual bucket that doubles as storage for components and includes a full-color installation guide with QR codes linking to step-by-step videos. For first-time drip irrigators, this level of support significantly flattens the learning curve and ensures successful setup.
The kit contains premium components including patented pressure-compensating emitters that deliver consistent flow regardless of elevation changes – crucial for watering hanging baskets alongside ground-level containers. With 100 feet of distribution tubing and 50 emitters, this system can easily handle 20-25 containers and includes specialized stakes that securely position emitters in pots. Rain Bird’s reputation for longevity is well-deserved, with many gardeners reporting systems still functioning perfectly after 5+ years of continuous use. For more information on setting up your system, you can check out Rain Bird’s guide on planning an automatic drip watering system.
4. Claber 8053 Oasis Garden Watering System

Image from www.hammacher.com.
The Claber 8053 Oasis takes a different approach with a gravity-fed design that operates independently of water pressure or electrical connections. This Italian-engineered system uses a 6.6-gallon reservoir and specialized drippers that deliver precisely 0.05 gallons per day to each connected container. It’s ideal for balcony gardens without accessible spigots or for situations where you need absolutely consistent watering during brief absences.
5. Moistenland Automatic Drip Irrigation System with WiFi Timer
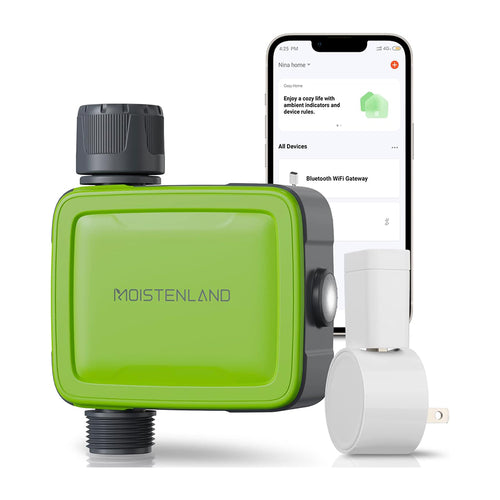
Image from moistenland.com.
For tech-savvy gardeners, the Moistenland system offers cutting-edge control through its WiFi-enabled timer that connects directly to your smartphone! This allows remote adjustments to watering schedules, instant system activation when unexpected heat arrives, and monitoring of system performance from anywhere. The associated app even integrates with local weather forecasts to suggest optimal watering adjustments based on upcoming conditions.
6. Flantor Garden Irrigation System with Adjustable Nozzles

Image from www.amazon.com.
The Flantor system distinguishes itself with exceptional adjustability at each emission point. Each nozzle can be fine-tuned from a gentle mist to a more substantial stream, allowing customization for different plant types within the same system. This is particularly valuable for mixed container gardens where moisture-loving ferns might sit alongside drought-tolerant succulents.
With its 32 misting nozzles and 50 feet of tubing, the Flantor kit handles both standard containers and hanging baskets equally well – as well as small garden beds. The package includes specialized nozzle mounts for hanging baskets that position the water delivery precisely where needed without unsightly tubing draped across your plants.
Unlike many budget systems, Flantor uses UV-resistant tubing that maintains flexibility and doesn’t become brittle even after multiple seasons in direct sunlight. This durability factor makes it particularly suitable for exposed patio installations where lesser materials would deteriorate quickly.
| Kit Name | Best For | Container Capacity | Key Feature | Price Range |
|---|---|---|---|---|
| Raindrip R560DP | Mixed containers | 20 containers | Specialized hanging basket components | $30-40 |
| Orbit 69525 | Large containers | 12 containers | 360° micro-bubblers | $25-35 |
| Rain Bird DRIPPAILQ | Beginners | 20-25 containers | Comprehensive instructions | $40-50 |
| Claber 8053 Oasis | No-water-source locations | 20 containers | Gravity-fed operation | $35-45 |
| Moistenland WiFi | Tech enthusiasts | 30 containers | Smartphone control | $50-70 |
| Flantor Garden | Mixed plant needs | 32 containers | Adjustable flow nozzles | $20-30 |
DIY Setup: Installing Your Container Drip System in 5 Steps
Installing a container drip system is surprisingly straightforward, even for gardeners with limited technical skills. Most kits include all necessary components and can be set up in a single afternoon. The process is modular and forgiving – if you make a mistake, components can easily be reconfigured without starting over. The following steps will guide you through the installation process for any standard drip irrigation kit.
1. Map Your Container Layout
Before opening your kit, sketch your container arrangement, measuring distances between pots and to your water source. This planning stage is crucial for determining optimal tubing pathways and ensuring you have sufficient materials. Note container sizes and plant types to identify which will need higher or lower water volumes.
Consider how your containers might be rearranged throughout the season as plants grow or are replaced. Planning for flexibility now saves complications later. For example, installing slightly more tubing than immediately needed allows for future expansion without system redesign.
Identify potential challenges like elevation changes, sharp corners, or high-traffic areas where tubing might be disturbed. Solutions might include securing tubing with additional stakes in high-traffic zones or running distribution lines along baseboards rather than across open spaces.
- Measure the distance from water source to furthest container
- Group containers with similar watering needs together when possible
- Mark specific locations requiring specialized emitters (hanging baskets, large planters)
- Consider seasonal sun patterns that might affect watering requirements
- Plan for potential system expansion with additional containers
2. Connect Your Water Source and Timer
The foundation of your system begins at the water source. Attach your backflow preventer directly to the spigot (this critical component prevents contaminated water from flowing back into your household supply), followed by your timer and pressure regulator. The pressure regulator is non-negotiable – standard household water pressure will damage drip components without this protection – typically reducing pressure to around 25 PSI for optimal drip operation.

Image from www.tyrantfarms.com.
3. Run Main Distribution Tubing
From your water source connection, extend the main 1/2-inch tubing along your planned route, using stakes to secure it every 2-3 feet. This main line serves as the backbone of your system, carrying water to all branches and emitters. Avoid sharp bends which can kink tubing and disrupt water flow.
When navigating corners, use elbow fittings rather than forcing the tubing to bend sharply. For every major directional change, secure the tubing with an additional stake to prevent movement. If running tubing across walkways is unavoidable, consider burying it in a shallow trench or using a commercial tubing shield to prevent tripping hazards.
4. Place Emitters for Each Container
For each container, punch a hole in the main tubing using the hole punch tool included in your kit, then insert a barbed connector. Run 1/4-inch micro-tubing from this connector to your container, cutting it to appropriate length with scissors or pruners. Finally, attach the appropriate emitter for your container size – typically 0.5 GPH for small pots, 1 GPH for medium containers, and 2-5 GPH for large planters – and secure it in the soil with a stake to prevent dislodging.
5. Test and Adjust Your System
Run your system manually for 5-10 minutes to check for leaks, blocked emitters, or inadequate water distribution. Watch carefully as water penetrates the soil in each container – you should see even moisture distribution without runoff. Make adjustments as needed, potentially swapping emitters for different flow rates or repositioning them for better coverage. Once everything functions correctly, program your timer for appropriate duration and frequency based on your climate, container sizes, and plant needs.
Seasonal Adjustments: Keeping Your Container Plants Happy Year-Round
A well-designed drip system isn’t set-and-forget – it requires seasonal adjustments to match changing plant needs and environmental conditions. Container gardens experience more extreme temperature fluctuations than in-ground gardens, requiring more responsive irrigation management. The good news is that most timers make these adjustments simple to implement.
Spring generally requires moderate watering as plants establish but temperatures remain mild. As summer heat intensifies, gradually increase both frequency and duration of watering cycles, sometimes doubling or tripling water delivery during peak heat. Fall typically requires scaling back to spring levels as temperatures moderate and daylight hours decrease.
Winter presents unique challenges depending on your climate. In mild areas, reduced watering may continue through winter for evergreen containers. In freezing regions, systems should be drained and disconnected, with components stored indoors to prevent freeze damage. Smart timers with temperature sensors can automatically suspend watering during cold snaps, preventing ice formation in containers.
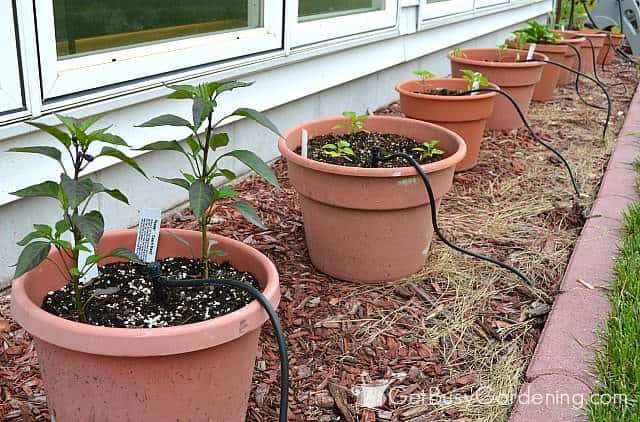
Image from getbusygardening.com.
Summer Watering Schedule Adjustments
During peak summer heat, container plants may require watering twice daily – typically early morning and late afternoon to avoid midday evaporation losses. Programming your timer for these split sessions improves absorption and reduces water waste. For extremely hot periods (95°F+), consider temporarily increasing emitter flow rates or adding supplemental emitters to containers showing stress signs. Monitoring soil moisture by inserting your finger 2 inches deep provides valuable feedback on whether your adjustments are sufficient.
Winter Protection for Your Drip System
In regions where temperatures drop below freezing, winterizing your drip irrigation system is essential to prevent damage. Start by disconnecting the system from your water source and removing the timer and pressure regulator for indoor storage. Drain all water from the main lines by disconnecting the end caps and elevating sections to encourage complete drainage. For thorough protection, use an air compressor with a blow-out adapter to force remaining water from the lines, especially in systems with numerous branches and emitters.
Modifying Your Setup for Different Plant Needs
One of the greatest advantages of drip irrigation is its adaptability to diverse plant requirements. For moisture-loving plants like ferns and impatiens, install additional emitters or select higher flow rates to maintain consistently moist soil. Conversely, for drought-tolerant plants like succulents and Mediterranean herbs, reduce emitter flow rates or extend intervals between watering cycles. Seasonal plants with changing water needs can be accommodated by simply swapping emitters as requirements evolve. This customization capacity ensures each container receives precisely the right amount of water, eliminating both the stress of drought and the dangers of overwatering.
Troubleshooting Common Container Drip System Problems
Even the best-designed drip systems occasionally encounter issues, but most are easily resolved with basic troubleshooting. Regular system checks during operation will help identify problems before they affect plant health. The three most common issues – clogged emitters, pressure fluctuations, and physical damage – all have straightforward solutions that typically require minimal time and no specialized tools. Developing a seasonal maintenance routine will prevent many problems before they occur and extend your system’s useful life by years.
Dealing with Clogged Emitters
Mineral deposits and tiny debris particles are the primary culprits behind clogged emitters, especially in areas with hard water. Signs include reduced or uneven water flow, dry soil despite system operation, or visibly blocked emitter openings. For minor clogs, remove the emitter and soak it in equal parts white vinegar and water for 30 minutes to dissolve mineral buildup before rinsing thoroughly.
Prevention is the most effective strategy – install a mesh filter at your water source and clean it monthly during active use. For systems in hard water areas, consider installing an inline calcium filter or periodically running a diluted vinegar solution through your entire system (with plants temporarily removed). Pressure-compensating emitters with self-cleaning features cost slightly more initially but can prove worthwhile in areas prone to clogging issues.
Fixing Pressure Issues
Inadequate pressure results in uneven water distribution, particularly affecting containers furthest from the water source. Common symptoms include strong flow at near containers but weak or non-existent flow at distant points. First, check for kinks in the tubing that might restrict flow. If the tubing is clear, examine your pressure regulator – it may need replacement if water pressure has declined throughout the system.
Excessive pressure manifests as blown connections, leaking fittings, or emitters popping out of position during operation. This typically indicates a failing pressure regulator that’s allowing full household pressure (often 40-80 PSI) to reach components designed for 25 PSI or less. Immediately replace the pressure regulator to prevent further damage. For complex systems with significant elevation changes, consider installing pressure-compensating emitters that deliver consistent flow regardless of pressure fluctuations.
Repairing Leaks and Breaks
Physical damage from foot traffic, curious animals, or UV deterioration commonly causes leaks in drip systems. For punctured main lines, cut out the damaged section and reconnect using a straight coupling. For smaller 1/4-inch tubing, simply cut at the damage point and reinsert into the fitting. Keep a small repair kit with various couplings, goof plugs (to seal unwanted holes), and end caps for quick fixes.
Leaking connections usually indicate improper initial installation or aging components. For barbed fittings, ensure tubing is fully seated by pressing firmly until you feel it “pop” into position. If leaking persists, the fitting may have microscopic cracks and should be replaced. UV damage typically appears as brittle, cracking tubing that loses flexibility over time. While most quality systems use UV-resistant materials, extremely exposed installations may require replacement of sun-damaged sections every 3-5 years.

Image from www.youtube.com.
From Hassle to Hobby: How Drip Irrigation Transforms Container Gardening
The true value of a well-implemented drip irrigation system extends far beyond convenience – it fundamentally changes your relationship with your container garden. When watering shifts from a daily burden to an automated background process, you’ll discover newfound freedom to focus on the more rewarding aspects of gardening. Plant selection, creative arrangement, seasonal transitions, and harvesting all receive the attention they deserve when basic maintenance no longer consumes your gardening hours.
Container gardeners who install drip systems consistently report not just better plant performance but significantly enhanced enjoyment of their gardens. The ability to travel without arranging plant care, to sleep through early morning watering sessions during summer heat waves, and to maintain optimal moisture levels without constant monitoring transforms container gardening from a demanding responsibility into a genuine pleasure. With water delivered precisely where needed, when needed, your plants will reward you with improved growth, more abundant flowering, and increased resilience to environmental stresses – all while you invest less time in basic maintenance and more in the creative joys of gardening!
Frequently Asked Questions
As you implement your container drip irrigation system, you’ll likely encounter questions about optimization, special situations, and maintenance requirements. The following answers address the most common inquiries from container gardeners new to drip irrigation.
How often should I run my drip irrigation system for container plants?
Optimal frequency depends on container size, plant type, weather conditions, and potting medium. As a starting point, small containers (under 8″) typically need daily watering during growing season, medium containers (8-14″) benefit from every-other-day cycles, and large containers (over 14″) may only require twice-weekly irrigation. During periods of extreme heat, increase frequency rather than duration – multiple shorter cycles promote better absorption than one long session. Monitor soil moisture by inserting your finger 2 inches deep; if it feels dry at that depth, increase frequency or duration until moisture remains consistent.
Can I use drip irrigation for indoor container plants?
Absolutely! Indoor drip systems work exceptionally well for houseplant collections, offering the same benefits of consistent moisture and reduced maintenance. For indoor use, consider self-contained systems with reservoirs rather than faucet connections, or install a splitter with shutoff valve on a utility sink. Position emitters carefully to prevent water contact with furniture or flooring, and place trays under containers to catch any potential overflow. Many indoor gardeners find that micro-tubing can be discretely routed behind furniture or along baseboards for a clean aesthetic appearance.
Do I need to remove my drip irrigation system during winter?
In regions where temperatures rarely drop below freezing, your outdoor system can remain installed year-round with reduced watering frequency during dormant periods. For areas with freezing temperatures, the system should be disconnected from the water source, drained completely, and have sensitive components like timers and pressure regulators stored indoors. Main tubing can typically remain in place unless extreme cold (below 20°F) is expected for extended periods. Proper winterization prevents burst pipes, cracked fittings, and damaged timers that would otherwise require significant spring repairs or complete system replacement.
How do I know if my plants are getting enough water from the drip system?
Monitor both soil moisture and plant appearance for accurate assessment. Properly watered container soil should feel slightly damp but not soggy when you insert your finger 2 inches deep. Healthy plants display firm leaves, stable or increasing growth, and no wilting during peak sun hours. After initial system setup, check containers after watering cycles to ensure water has penetrated evenly throughout the root zone rather than channeling down sides. Occasionally place a saucer under containers to verify that just a small amount of water flows through – this indicates complete soil saturation without excessive runoff.
If plants show stress despite regular irrigation, consider the emitter placement. Emitters should be positioned near plant bases for new installations, then moved to the container edge as root systems develop. This encourages roots to grow throughout the entire soil volume rather than clustering around the water source. Multiple emitters may be necessary for containers larger than 14 inches in diameter to ensure even moisture distribution.
Can I connect my drip irrigation system to a rain barrel?
Yes, rain barrels make excellent eco-friendly water sources for drip systems, though some modifications are necessary. Since rain barrels rely on gravity rather than municipal pressure, position your barrel at least 3 feet above your highest container to generate adequate pressure. Install a fine-mesh filter between the barrel and your irrigation lines to prevent organic debris from clogging emitters. For consistent performance, consider adding a small submersible pump with pressure regulation to maintain optimal system pressure regardless of water level in the barrel. For more ideas on eco-friendly gardening, explore these efficient water management systems for urban gardens.
Many environmentally-conscious gardeners create hybrid systems that automatically switch between municipal water and rain barrel sources based on water availability. This maximizes rainwater usage while ensuring garden health during dry periods. The modest investment in additional components pays dividends in water conservation and reduced utility costs throughout the growing season.
With the right drip irrigation system in place, your container garden will thrive with minimal intervention. Plants receive precisely the moisture they need, water conservation becomes automatic, and you’ll enjoy more time appreciating your garden rather than maintaining it! Whether you’re growing culinary herbs, showy flowers, or prized vegetables, drip irrigation transforms container gardening from a daily chore into a sustainable pleasure.
Featured Image from yardandgarden.extension.iastate.edu.

Related Posts
-
 [Video] How to Grow Tasty Bean Sprouts Indoors
- How to Grow Herbs In a Mason Jar
- Vertical Gardening Roundup: Resources for Growing More In Less Space
- [Video] 3 Ways To Make Biodegradable Seed-Starting Pots
- Top 6 Organic Soils for Indoor & Container Gardening
- [Video] How To Safely Reuse Old Potting Soil


