Composting 101: A Complete Guide to Efficient Organic Waste Recycling

New to composting? Check out our new Composting 101 guide for step-by-step guidance on getting started!
Key Takeaways:
- Food scraps and yard waste make up more than 28% of what we throw away — composting keeps that out of landfills and puts it to work.
- The carbon-to-nitrogen ratio (the “browns vs. greens” balance) is the single most important factor in how fast your compost breaks down.
- There are multiple composting methods — from backyard bins to vermicomposting — and one will fit your lifestyle, even if you live in an apartment.
- Composting doesn’t just reduce waste; it actively improves soil health, cuts greenhouse gas emissions, and helps plants survive drought conditions.
- Common composting problems like bad smells or a pile that won’t break down are easy to fix once you know what’s causing them — keep reading to find out how.
Composting is one of the simplest things you can do to cut waste, feed your soil, and make a measurable dent in your environmental footprint!
According to the U.S. Environmental Protection Agency (EPA), food scraps and garden waste combined make up more than 28 percent of what we throw away. That’s nearly a third of your trash that could be transformed into something genuinely useful — a rich, dark, crumbly material that gardeners call “black gold!”

Image from everagro.com.
Composting Turns Waste Into Gold — Here’s How
Composting is the natural process of recycling organic matter — things like vegetable peels, coffee grounds, dried leaves, and grass clippings — into a valuable soil amendment. It’s not magic. It’s biology. Given the right conditions, bacteria, fungi, worms, and other decomposers break down organic material into a stable, nutrient-rich end product called compost.
What Composting Actually Does to Organic Waste
When organic waste goes to a landfill, it breaks down without oxygen. That process produces methane — a greenhouse gas roughly 25 times more potent than carbon dioxide over a 100-year period. Composting, by contrast, is an aerobic process. Oxygen-loving microorganisms do the heavy lifting, and the result is carbon dioxide and water vapor instead of methane. The difference in climate impact is significant.
Beyond emissions, composting recycles nutrients back into the soil. Nitrogen, phosphorus, potassium, and dozens of micronutrients that were locked inside your banana peel or autumn leaves get released in forms that plants can actually absorb. It closes the loop in a way that synthetic fertilizers simply can’t replicate.
Why “Black Gold” Is the Perfect Nickname for Compost
Finished compost looks and feels like rich, dark garden soil. It has an earthy smell, a crumbly texture, and an impressive nutritional profile. Farmers and gardeners have nicknamed it “black gold” because it does so much — it improves soil structure, boosts water retention, feeds beneficial soil microbes, and reduces the need for chemical inputs. One material. Multiple benefits. Zero waste!
The Science Behind Decomposition
Understanding what’s actually happening inside your compost pile takes the guesswork out of the process. Composting isn’t just “throwing stuff in a pile and waiting.” It’s a carefully orchestrated biological system — and once you understand the players, you can manage it far more effectively.
The Role of Bacteria and Fungi in Breaking Down Waste
Bacteria are the primary workhorses of decomposition. In the early stages of composting, mesophilic bacteria (those that thrive at moderate temperatures) begin breaking down easily digestible materials. As the pile heats up, thermophilic bacteria take over and work at temperatures between 130°F and 160°F (54°C–71°C). This heat is actually useful — it kills weed seeds and pathogens that you don’t want in your finished compost.
Fungi play a supporting role, breaking down tougher materials like woody stems and dried leaves that bacteria struggle with. You might notice white, thread-like strands (called mycelium) running through your pile — that’s fungi at work, and it’s a good sign! Together, bacteria and fungi create a powerful decomposition team that no synthetic process can match for efficiency or sustainability. For more on fungi, check out this guide on creating a mushroom log.

Image from www.pestrol.com.au.
How Heat Speeds Up the Composting Process
A hot compost pile is a fast compost pile. When managed correctly — with the right moisture, aeration, and carbon-to-nitrogen balance — a pile can reach internal temperatures of 130°F to 160°F within just a few days. At those temperatures, decomposition accelerates dramatically. Hot composting can produce finished compost in as little as 4 to 8 weeks, compared to several months for a cold (passive) pile.
To maintain heat, the pile needs to be large enough to insulate itself — generally at least 3 feet by 3 feet by 3 feet (roughly 1 cubic meter). Turning the pile every few days introduces fresh oxygen and brings cooler outer material into the hot center, keeping the microbial activity going strong throughout the entire pile.
- Cold composting: Minimal effort, minimal maintenance — just add materials and wait. Can take 6 months to 2 years.
- Hot composting: Active management with turning and moisture monitoring. Produces compost in 4–8 weeks.
- Vermicomposting: Uses red wiggler worms to break down food scraps quickly indoors or outdoors.
- Trench (or sheet) composting: Bury organic waste directly in the garden bed; earthworms in the soil do the rest.
Carbon-to-Nitrogen Ratio: Why Balance Matters
The single most important variable in composting is the ratio of carbon-rich materials (“browns”) to nitrogen-rich materials (“greens”). The ideal carbon-to-nitrogen (C:N) ratio for an actively composting pile is roughly 25:1 to 30:1 by weight. In practical terms, that translates to about 3 parts browns to 1 part greens by volume. Too much nitrogen and your pile becomes wet, slimy, and foul-smelling. Too much carbon and decomposition slows to a crawl.
What You Can and Cannot Compost
Not everything organic belongs in a compost pile. Knowing what to add — and what to keep out — is the difference between a thriving pile and a smelly, pest-ridden mess. For a quick visual guide, check out this graphic.
Greens: Nitrogen-Rich Materials to Add
Green materials are the nitrogen sources that fuel microbial activity and drive decomposition. They tend to be moist and break down relatively quickly on their own.
| Green Material | Notes |
|---|---|
| Fruit and vegetable scraps | Chop into smaller pieces to speed breakdown |
| Coffee grounds and filters | Excellent nitrogen source; worms love them |
| Grass clippings | Add in thin layers to prevent matting |
| Fresh plant trimmings | Avoid diseased plants |
| Eggshells | Add calcium; crush before adding |
| Tea bags (paper only) | Remove staples first |
Fresh materials like grass clippings are high in nitrogen but can compact and form an impenetrable mat that blocks airflow. Always mix them in with bulkier carbon materials to keep the pile loose and aerated. A thin layer of grass clippings followed by a layer of dried leaves is a simple, effective combination.
Browns: Carbon-Rich Materials to Add
Browns provide the carbon framework that microorganisms use for energy. They also add physical structure to the pile, improving airflow and preventing it from becoming a soggy, compacted mass.
- Dried leaves (one of the best and most abundant brown materials available)
- Cardboard and paper (shredded or torn into small pieces)
- Straw and hay
- Sawdust and wood chips (use sparingly — very high carbon content)
- Paper bags and newspaper (non-glossy only)
- Corn stalks and husks
Autumn leaves are essentially a free, abundant carbon source that most people throw away. Shredding them before adding to the pile significantly speeds up their breakdown — whole leaves can mat together and resist decomposition for months.

Image from lawnlove.com.
What Never Goes in a Compost Pile
Some materials will undermine your entire composting effort — either by attracting pests, creating pathogens, or simply not breaking down in a home composting environment. Meat, fish, and dairy products are the big three to avoid in backyard bins — they decompose slowly, smell awful, and draw in raccoons, rats, and flies. Diseased plants should stay out too, especially if you’re cold composting, since the pile won’t get hot enough to kill the pathogens. Pet waste from dogs and cats carries bacteria and parasites that home composting cannot safely neutralize. Glossy paper, treated wood products, and anything containing synthetic chemicals round out the no-go list.
How to Choose the Right Composting Method
There’s no single “best” composting method — there’s only the best method for your situation. Your available space, how much organic waste you generate, and how much time you want to invest all factor into the decision. The good news is that there’s a workable option for everyone, from someone with a sprawling backyard to someone in a studio apartment.
Backyard Compost Bins: Best for Most Households
A backyard compost bin is the most common and accessible starting point for home composters. You can buy a purpose-built bin — like the FCMP Outdoor IM4000 Tumbling Composter or a simple open-bottom plastic bin — or build one yourself from wooden pallets or wire mesh. The key advantage of an enclosed bin over an open pile is that it retains heat and moisture more effectively while keeping pests out.
Placement matters more than most beginners realize. Set your bin on bare soil rather than concrete — this allows beneficial worms and microorganisms from the ground to migrate up into the pile. Choose a spot with partial shade to prevent the pile from drying out too quickly in summer, and make sure it’s close enough to your kitchen that adding scraps doesn’t feel like a chore. Convenience drives consistency!
Vermicomposting: Let Worms Do the Work
Vermicomposting uses red wiggler worms (Eisenia fetida) — not the common earthworm you’d dig up in the garden — to break down food scraps into an exceptionally rich compost called worm castings. A well-maintained worm bin can process several pounds of food waste per week, and the resulting castings are among the most nutrient-dense soil amendments available. Worm bins can be kept indoors, making this the top option for apartment dwellers or anyone without outdoor space.
A basic vermicomposting setup involves a shallow bin (worms feed near the surface), damp bedding material like shredded newspaper or coconut coir, and a steady supply of fruit and vegetable scraps. Avoid citrus, onions, and spicy foods — red wigglers are sensitive to acidic or pungent materials. Keep the bin between 55°F and 77°F (13°C–25°C) and the worms will do the rest with almost no intervention required.
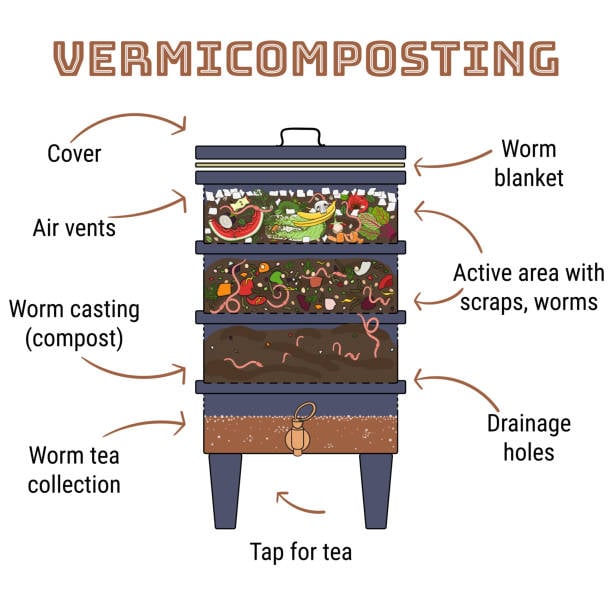
Image from unclejimswormfarm.com.
Community and Municipal Composting Programs
If home composting isn’t practical for your lifestyle, community and municipal programs fill the gap. Many cities now offer curbside organics collection alongside regular recycling pickup. Drop-off sites at farmers markets and community gardens are another option. These programs accept a wider range of materials — including meat and dairy in some cases — because they use industrial-scale systems that generate higher temperatures than any backyard pile can achieve. They often share the compost back to the community, so you can collect finished compost as your reward for contributing!
How to Build Your First Compost Pile
Building a compost pile for the first time is genuinely simple. The process comes down to layering the right materials, maintaining moisture, and giving the pile occasional attention. Follow these five steps and you’ll have finished compost working in your garden within a few months!
1. Pick the Right Location
Choose a level, well-drained spot that gets partial sun. Full sun dries the pile out too quickly; full shade slows decomposition. Proximity to a water source is helpful since you’ll need to keep the pile moist. If you’re using an open pile rather than a bin, position it somewhere you won’t mind looking at — you’re more likely to tend it regularly if it’s not hidden in an inconvenient corner of the yard.
2. Layer Your Browns and Greens
Start with a base layer of coarse browns — wood chips, straw, or small twigs work well — about 4 to 6 inches deep. This creates airflow from the bottom. Then alternate layers of greens and browns, roughly following that 3:1 carbon-to-nitrogen ratio by volume. Think of it like building a lasagna: each layer serves a purpose, and the variety of materials creates a more balanced, active decomposition environment.
Chop or shred materials before adding them whenever possible. Smaller particle sizes expose more surface area to microbial activity, which directly accelerates breakdown. A whole head of cabbage might take months to decompose; the same cabbage chopped into rough chunks could break down in weeks.
3. Keep It Moist but Not Soggy
The moisture level of your compost pile should feel like a wrung-out sponge — damp throughout but not dripping. Microorganisms need water to survive and function, but a waterlogged pile cuts off oxygen and shifts the environment toward anaerobic decomposition (which produces that characteristic rotten smell). In dry weather, water the pile lightly when you turn it. In wet weather, cover it with a tarp or lid to prevent saturation.
4. Turn the Pile Regularly
Turning the pile introduces fresh oxygen, redistributes moisture, and moves cooler outer material into the hot center where decomposition is most active. For hot composting, turn every 3 to 7 days. For a more passive approach, once every 2 to 4 weeks is sufficient. Each time you turn the pile, you’ll notice the internal temperature drop slightly before rising again — that’s the microbial population ramping back up with the fresh oxygen supply. A long-handled compost aerator tool or a pitchfork both work well for this.
5. Know When Your Compost Is Ready
Finished compost is dark brown to black, crumbly, and smells like fresh earth — not like rotting food. You should no longer be able to identify the original materials that went into the pile. If you still see recognizable food scraps or leaves, give it more time. A simple test: fill a zip-lock bag with a small sample and seal it for a few days. If it still smells earthy when you open it, it’s ready. If it smells sour or off, it needs more time in the pile.

Image from firstsaturdaylime.com.
The Environmental Impact of Composting
Composting isn’t just a gardening habit — it’s a climate action! The benefits extend far beyond your backyard, touching on greenhouse gas reduction, water conservation, and long-term soil health at a landscape scale. When adopted widely, composting has the potential to meaningfully shift how communities manage organic resources.
How Composting Reduces Landfill Methane Emissions
When organic waste is buried in a landfill, it decomposes anaerobically — without oxygen. This process generates methane, a potent greenhouse gas. Landfills are one of the largest human-related sources of methane emissions. Diverting organic waste from landfills through composting eliminates the conditions that produce methane in the first place. Instead of a climate liability, that banana peel becomes a soil asset. Composting at scale — through both household and municipal programs — represents one of the most practical and immediately deployable strategies for reducing emissions from the waste sector.
Composting’s Role in Drought Mitigation and Soil Health
Compost dramatically improves a soil’s ability to hold water. Just a 5% increase in organic matter makes soil four times more capable of retaining water — a difference that becomes critical during dry spells and drought conditions. When compost is worked into sandy soil, it binds particles together and increases water retention. In clay soil, it does the opposite — breaking up dense clumps and improving drainage. This dual action makes compost one of the most versatile soil amendments available, regardless of your soil type.
Beyond water retention, compost feeds the invisible ecosystem living beneath your feet! Healthy soil teems with bacteria, fungi, nematodes, and earthworms — a community of organisms that cycle nutrients, suppress plant disease, and build soil structure over time. Synthetic fertilizers feed plants directly but do nothing for this underground ecosystem. Compost feeds the system, creating long-term soil fertility that compounds year after year rather than depleting with each growing season.
Common Composting Mistakes and How to Fix Them
Even experienced composters run into problems. The good news is that virtually every composting issue traces back to one of just a few root causes — and all of them are fixable. Here’s how to diagnose and correct the two most common problems you’ll encounter. For a more comprehensive guide, check out this article to enhance your composting skills.
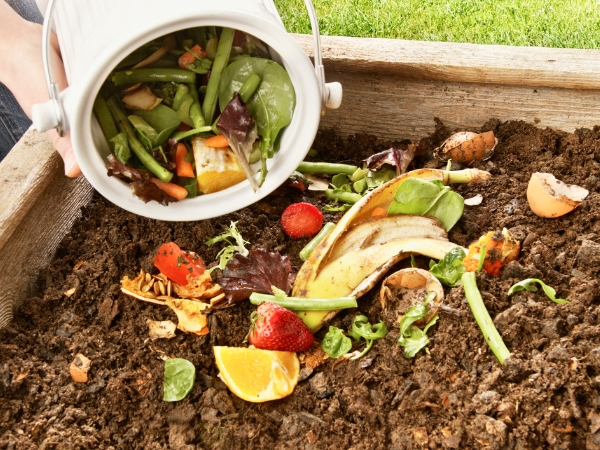
Image from canadale.ca.
Pile Smells Bad: Likely Causes and Solutions
A foul-smelling compost pile is almost always the result of too much nitrogen, too much moisture, or insufficient airflow — often a combination of all three. If the pile smells like ammonia, you have an excess of nitrogen-rich greens. Fix it by adding carbon-rich browns — dried leaves, shredded cardboard, or straw — and turning the pile to introduce oxygen. If it smells like rotten eggs, the pile has gone anaerobic. This means it’s too wet and compacted. Turn it immediately, add dry browns, and if the pile is in an enclosed bin, check that there’s adequate ventilation. In both cases, the solution involves the same basic actions: rebalance the C:N ratio, restore airflow, and manage moisture. Within a few days of corrective action, the smell should dissipate significantly.
Pile Is Not Breaking Down: What to Adjust
A pile that seems frozen in time — materials looking the same week after week — is typically too dry, too carbon-heavy, or too small to generate meaningful heat. Start by checking moisture: grab a handful of material from the center and squeeze it. If nothing comes out and it feels dusty, water the pile thoroughly. If the C:N balance is off — too many browns — add a nitrogen boost with fresh grass clippings, kitchen scraps, or a small amount of blood meal or cottonseed meal. Finally, if the pile is smaller than 3 feet by 3 feet by 3 feet, it simply can’t insulate itself well enough to heat up. Combine multiple smaller piles or add more material to reach critical mass. Shredding materials before adding them also makes a measurable difference — smaller particle sizes dramatically increase the surface area available to microorganisms and increases decomposition speed.
Start Composting Today — Your Soil Will Thank You
Every kitchen scrap you compost is a vote for a healthier planet — and healthier soil in your own backyard! You don’t need expensive equipment or a large yard to get started. A small bin, a handful of dried leaves, and your daily food scraps are enough to begin. Start simple, pay attention to how your pile responds, and adjust as you go. The more time you spend with it, the more intuitive it becomes.

Image from www.lacostegardencentre.com.
Frequently Asked Questions
Composting raises a lot of practical questions — especially for first-timers who want to get it right. The answers are usually simpler than people expect, and knowing them upfront saves a lot of trial and error.
Below are the most common questions about home composting, answered clearly and directly so you can move forward with confidence.
How Long Does It Take for Compost to Be Ready to Use?
It depends on your method and how actively you manage the pile. Hot composting with regular turning and proper moisture can produce finished compost in as little as 4 to 8 weeks. Cold composting — the hands-off approach where you add materials and leave them to break down on their own — typically takes anywhere from 6 months to 2 years.
Vermicomposting sits somewhere in between. A healthy worm bin can produce usable castings in 2 to 3 months, depending on feeding frequency and bin temperature.
In all cases, finished compost is dark, crumbly, and smells like fresh earth. If you can still identify what went in, it needs more time.
Can I Compost in an Apartment Without a Yard?
Absolutely. Vermicomposting is the go-to method for apartment dwellers. A small worm bin — like the Worm Factory 360 — can sit under a kitchen counter or in a closet and process several pounds of food scraps per week with no odor when managed correctly. Alternatively, many cities now offer curbside organics pickup or community drop-off sites where you can bring your kitchen scraps without needing any composting setup at home. If you still want to compost at home and don’t have a lot of space, a countertop composter might be a viable option, though you’ll pay more for it. Check out our list of compact composters for suggestions.
How Do I Keep Pests Away From My Compost Pile?
Pests are attracted to compost piles primarily by meat, dairy, cooked foods, and oily scraps — so the simplest prevention is keeping those materials out of a backyard bin entirely. Stick to raw fruit and vegetable scraps, coffee grounds, and dry carbon materials.
Beyond that, use an enclosed bin with a secure lid rather than an open pile. Bury fresh food scraps in the center of the pile rather than leaving them exposed on top, and always cover new additions with a layer of browns. If rodents are a persistent problem in your area, look for a bin with a solid base or place a wire mesh barrier underneath the pile to block burrowing access from below.
Is It Okay to Compost in Winter?
Yes — composting slows significantly in cold weather but doesn’t have to stop entirely. Microbial activity decreases as temperatures drop, and a pile may freeze solid in harsh winters. However, the materials inside are preserved and will begin decomposing again as soon as temperatures rise in spring. To extend the active season, insulate the pile with a thick layer of straw bales around the sides, use a dark-colored bin that absorbs solar heat, and continue adding materials through winter. Even a dormant pile is still working — just slowly.
How Much Compost Should I Add to My Garden Soil?
For establishing a new garden bed, work in a 2- to 4-inch layer of finished compost and till or turn it into the top 6 to 8 inches of soil. This gives your soil a substantial biological and nutritional foundation before planting. For established beds, a 1- to 2-inch top dressing applied once or twice per year is typically sufficient to maintain soil health and fertility. You can even simply add some compost to planting holes when planting seedlings if you want to conserve your precious “gold” even further.
Container gardens benefit from a mix of roughly 20 to 30% compost by volume blended into potting media. Too much compost in containers can actually waterlog roots, so balance it with perlite or coarse sand to maintain good drainage. For lawn top-dressing, apply a thin ¼-inch layer and rake it gently into the grass — over time, this builds a healthier, more drought-resilient turf without chemical inputs.
Featured Image from www.aces-alliance.org.

Related Posts
-
 The Humble Earthworm: Your Organic Gardening Ally
- [Video] 5 Easy Fall Tips to Preparing Your Garden Soil for Spring Planting
- VermiHut 5-Tray Worm Compost Bin: An Apartment Dweller’s Guide to Recycling Kitchen Waste
- [Video] Using Tea Leaves In The Garden
- 3 Easy Homemade Organic Fertilizer Recipes
- [Video] How Much Compost Do You Need for Your Garden?


