The Ultimate Greenhouse Heating Guide: Efficient Solutions for Cold Climates

Learn how to keep your greenhouse warm in cold weather with this comprehensive greenhouse heating guide…
Key Takeaways:
- Combining passive heating methods like thermal mass and insulation can reduce greenhouse heating costs by up to 75% compared to relying solely on active heating systems.
- Electric, gas, and alternative fuel heaters each have distinct advantages based on your greenhouse size, climate severity, and budget constraints.
- DIY solutions such as compost heat exchange systems can provide substantial heat while recycling garden waste and promoting sustainability.
- Proper heat distribution through strategic fan placement and underground pipe systems is crucial for preventing damaging cold spots in your greenhouse.
- Smart controllers and zone heating strategies allow for precise temperature management while minimizing energy consumption during winter months.
Why Your Winter Greenhouse Needs Proper Heating Now
When winter temperatures plummet, your greenhouse transforms from a plant paradise into a potential cold trap that can damage or kill your precious crops overnight. Proper heating isn’t just about plant survival—it’s about maintaining optimal growing conditions that allow for continuous harvests even in the deepest winter months. Without adequate heating, condensation increases, disease pressure mounts, and growth slows to a frustrating crawl. Many greenhouse gardeners make the costly mistake of waiting until the first frost warning before implementing their heating strategy, only to discover their systems are inadequate or inefficient.

Image from www.planetnatural.com.
The difference between a productive winter greenhouse and a dormant one often comes down to implementing efficient greenhouse heating solutions that balance cost with effectiveness. According to research from VEVOR, a leader in greenhouse accessories and heating solutions, maintaining temperatures just 10°F above outdoor conditions can extend your growing season by 3-4 months in most climate zones. The key is developing a comprehensive heating approach that combines passive strategies with targeted active heating when necessary.
Your greenhouse heating requirements will depend on several factors: greenhouse size and construction materials, local climate severity, desired indoor temperature, and the specific needs of your crops. For example, year-round tomato production requires different heating strategies than overwintering dormant perennials. Understanding these variables is the first step toward creating an energy-efficient heating system that keeps plants thriving without unnecessary expense.
Smart Passive Heating Methods That Save Money
Before investing in active greenhouse heating equipment, maximize your greenhouse’s natural heat retention capabilities. Passive heating methods require little to no energy input and work by capturing, storing, and slowly releasing solar energy. These approaches form the foundation of any efficient greenhouse heating strategy, significantly reducing the workload of supplemental heaters when temperatures drop dangerously low.
Implementing multiple passive systems simultaneously creates a synergistic effect that can maintain temperatures 15-20°F above outdoor conditions with no additional energy input. When combined with basic active heating during extreme cold, these methods can slash your heating costs by as much as 75% compared to relying solely on electric or gas heaters!
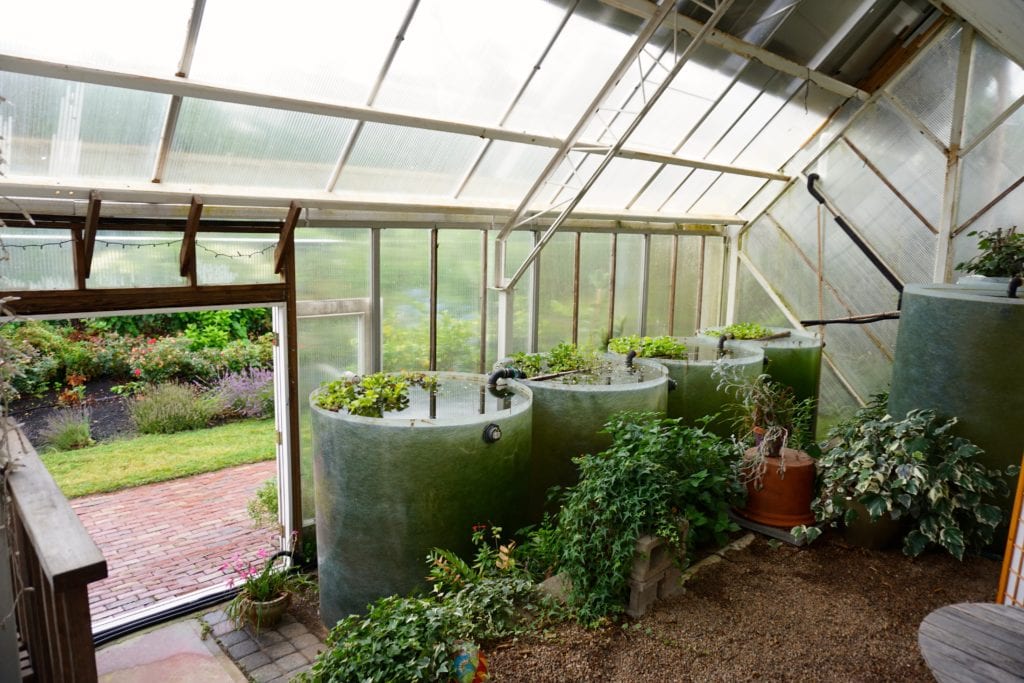
Image from ceresgs.com.
Thermal Mass: Water Barrels and Stone Benches
Thermal mass materials absorb heat during daylight hours and release it slowly as temperatures fall, creating a natural temperature buffer that prevents rapid cooling. Water stands out as the most efficient thermal mass material, storing approximately 2-3 times more heat per volume than concrete or stone. Strategic placement of 55-gallon water barrels painted black and positioned to receive direct sunlight can stabilize nighttime temperatures by 5-10°F in moderate climates.
For maximum effectiveness, aim to include 2-3 gallons of water per square foot of greenhouse floor space. Position the largest containers along north walls (in Northern Hemisphere) where they’ll receive maximum winter sun exposure without shading plants. During particularly cold spells, covering these thermal masses with insulation at night prevents heat from radiating upward and outward, instead directing it toward your plants.
Stone or concrete benches and pathways serve a dual purpose by providing both growing surfaces and thermal storage. Unlike water, these materials release heat more quickly, making them ideal for preventing rapid temperature drops during the critical hours after sunset. Consider incorporating both types of thermal mass for complementary heating cycles that maintain more consistent temperatures throughout the night. For more ideas on extending your growing season, consider using simple cold frames that can also help regulate temperature.
Double-Layered Walls for Superior Insulation
Doubling the insulation value of your greenhouse walls creates a dramatic improvement in heat retention with minimal investment. The most common approach uses two layers of greenhouse plastic or polycarbonate with an air gap between them. This simple modification reduces heat loss by approximately 40% compared to single-layer coverage by creating a dead air space that acts as an insulating buffer.
For existing greenhouses, installing an inner layer of bubble wrap specifically designed for horticultural use provides both insulation and diffused light that many plants prefer. The key to effectiveness lies in maintaining a consistent air gap between layers—aim for 1-2 inches of separation. Secure attachment points every 18-24 inches will prevent the layers from touching, which would reduce their insulating properties.
In extreme northern climates, consider installing permanent double-wall polycarbonate panels with UV protection. While more expensive initially, these products typically offer 10-15 year lifespans and superior R-values that dramatically reduce long-term heating costs. The improvement in light diffusion also eliminates hot spots and promotes more even plant growth throughout your greenhouse. Additionally, you can explore solar-powered grow lights for cost-effective solutions in your greenhouse.
Reflective Interior Surfaces Maximize Sun Exposure
Strategic use of reflective surfaces can increase available light by up to 30% while directing more solar energy toward thermal mass components. White or reflective north walls bounce southern exposure light back onto plants and heat-storing elements, effectively extending the sun’s heating potential during short winter days.
“In our research greenhouse, installing reflective materials on the north wall increased internal temperatures by an average of 7°F on sunny winter days compared to control structures. The reflected light also reduced stretching in test plants by promoting more even light distribution.” – Dr. Elena Martínez, Agricultural Engineering Department, Cornell University
Reflective mulch or light-colored gravel pathways further amplify light throughout the growing space. For maximum efficiency, use aluminum-faced bubble insulation on north-facing walls and any areas not requiring transparency. This material provides both reflectivity and additional R-value, multiplying your passive heating benefits. Ensure reflective surfaces remain clean throughout winter, as dust and condensation can significantly reduce their effectiveness.
Proper Sealing and Draft Prevention
Even the most powerful heating system proves ineffective if warm air constantly escapes through cracks and gaps in your greenhouse structure. A thorough inspection and sealing regimen should be completed before winter arrives, focusing on door frames, vents, and panel connections. Small air leaks can collectively increase heating costs by 15-25% while creating damaging cold drafts directly on plants.
Use weatherstripping tape specifically designed for greenhouse applications around doors and vents, as standard residential products may deteriorate quickly under high humidity and UV exposure. Silicone caulking works well for sealing static gaps between framing and panels. For temporary seasonal sealing, clear packing tape provides a quick fix for small cracks in polycarbonate panels or tears in plastic coverings.
Pay special attention to the greenhouse base, where the structure meets the foundation or ground. This junction often develops gaps that allow cold air infiltration while providing entry points for pests seeking winter shelter. Installing a skirt board of pressure-treated lumber or recycled plastic lumber creates an effective thermal break while preventing rodent entry.
Best Greenhouse Heaters for Cold Climate Zones
When passive heating reaches its limits during extreme cold, active heating systems become essential for plant survival. The ideal heating solution balances initial cost, operational efficiency, reliability, and compatibility with your greenhouse environment. Your choice should reflect your specific climate challenges, greenhouse size, and available utilities.
Consider redundancy in your heating approach—relying on a single heating method creates vulnerability during power outages or equipment failures. Smart gardeners implement a primary heating system supported by a backup method that can maintain minimum temperatures during emergencies. This layered approach might combine an electric primary heater with a propane backup, ensuring plant protection regardless of circumstances.

Image from www.greenhousetogrow.us.
Electric Heaters: Fan-Forced vs. Infrared Models
Electric heaters offer the cleanest, most controllable heating option for small to medium greenhouses with reliable power. Fan-forced models provide quick temperature adjustments and excellent air circulation but tend to create drier conditions that some plants dislike. These units distribute heat evenly by pushing warm air throughout the greenhouse, eliminating cold pockets that can damage sensitive crops.
Infrared electric heaters work differently by warming objects rather than air, similar to how sunlight heats surfaces. This approach proves more energy-efficient in drafty structures since plants receive direct warmth regardless of air temperature. For optimal coverage, position infrared heaters above plant areas and thermal mass elements, allowing the radiant heat to penetrate foliage and warm growing surfaces.
When selecting electric heating capacity, calculate approximately 10 watts per square foot of growing space in moderate climates and 15-20 watts per square foot in severe winter regions. Always choose greenhouse-rated models with sealed components designed to withstand humidity, and install proper circuit protection that meets the heater’s amperage requirements.
Natural Gas and Propane Options
For larger greenhouses or situations where electricity costs are prohibitive, natural gas and propane heating systems deliver substantial BTU output at lower operational costs. These systems typically provide 20-30% lower running expenses compared to electric heating in most regions, making them ideal for commercial operations or serious hobbyists with extensive winter growing programs.
Modern gas greenhouse heaters include safety features like oxygen depletion sensors and tip-over protection. Select units designed explicitly for greenhouse use with proper ventilation to address the combustion byproducts. Proper ventilation is non-negotiable—carbon dioxide from combustion benefits plant growth, but carbon monoxide and ethylene gas damage or kill plants even before affecting humans.
Propane offers flexibility for greenhouses without natural gas lines, requiring only a properly sized tank installed according to local safety codes. The portability of propane systems makes them excellent choices for remote greenhouses, though regular fuel delivery access becomes essential during winter months. For either gas type, size your system to provide 35-45 BTUs per square foot of greenhouse space in cold climates, ensuring adequate heating capacity during extreme weather events.
Woodstoves and Rocket Mass Heaters
Off-grid greenhouses benefit from wood-burning options that operate independently from utility services. Traditional woodstoves provide intense heat but require frequent attention and careful placement to prevent hot spots. Modern rocket mass heaters offer a more efficient alternative, burning wood at extremely high temperatures that extract maximum heat while producing minimal smoke.
The distinctive feature of rocket mass heaters is their heat storage capability—the exhaust channels through a thermal mass (typically cob, brick, or stone) before exiting, allowing the structure to absorb and slowly release heat for 12-24 hours after the fire dies. This creates a steady, gentle heat that maintains more consistent temperatures than direct wood burning. When properly designed, these systems can reduce wood consumption by 80-90% compared to conventional woodstoves.
Regardless of wood heating design, proper installation with heat shielding and professional chimney systems is essential for both safety and insurance requirements. Always check local codes and greenhouse insurance policies before installing any combustion heating system, as some policies restrict or prohibit certain heating methods.
Geothermal Systems for Large Installations
For large, permanent greenhouse structures with substantial winter production goals, ground-source heat pump systems offer unparalleled efficiency and long-term cost savings. These systems leverage the earth’s stable subsurface temperature (typically 45-55°F at depth) to provide heating in winter and cooling in summer with minimal energy input. While installation costs remain high ($15,000-$30,000 for medium-sized systems), operational expenses typically run 70-80% lower than conventional heating.
Two primary approaches exist for greenhouse applications. Closed-loop systems circulate antifreeze solution through underground pipes to exchange heat with the earth without directly using groundwater. Open-loop systems pump groundwater directly through the heat exchanger before returning it to the aquifer, offering higher efficiency but requiring suitable water quality and proper permits.
The greatest advantage of geothermal heating comes in its integration with greenhouse floor systems. Hydronic tubing embedded in concrete floors creates ideal root zone temperatures while allowing bench space to remain cooler—a perfect scenario for many crops that prefer warm roots but cooler foliage. This targeted heating approach minimizes energy waste while creating optimal growing conditions.
Solar-Powered Heating Solutions
Modern solar technologies provide innovative options for greenhouse heating that extend beyond passive collection. Active solar systems use collectors to heat air or liquid that transfers warmth to the greenhouse through fans or pumps. Unlike photovoltaic panels that generate electricity, thermal solar collectors capture heat directly, operating at 80-90% efficiency compared to 15-22% for electricity generation.

Image from www.renogy.com.
Solar hot water systems connect external collectors to water storage inside the greenhouse, creating substantial thermal mass that stabilizes temperatures. These systems work most effectively when combined with radiant floor heating or bench heating elements that distribute warmth at plant level. For smaller installations, solar air heaters mounted on south-facing walls provide daytime heating without the complexity of liquid-based systems.
For comprehensive energy independence, combine thermal solar collection with photovoltaic panels and battery storage. This integrated approach can power circulation fans, heating elements, and control systems while providing backup capacity during extended cloudy periods. While initial investment remains significant, federal and state incentives often reduce costs by 30% or more, making these systems increasingly accessible for serious greenhouse gardeners.
4 DIY Heating Projects Under $100
Heating your greenhouse doesn’t require expensive commercial solutions. With some basic materials and a weekend of work, you can build effective heating systems that significantly boost your greenhouse temperature without breaking the bank. These DIY projects utilize readily available materials and simple construction techniques accessible to gardeners with basic tools and minimal construction experience.
The beauty of these DIY approaches lies in their sustainability. Unlike commercial heaters that may consume fossil fuels or electricity, these solutions often tap into natural processes or repurpose waste materials. This reduces both your environmental footprint and ongoing operational costs, making your greenhouse more self-sufficient and aligned with sustainable gardening principles.
Each project addresses different heating needs, from capturing and storing solar energy to creating gentle biological heat through decomposition. By combining several of these approaches, you can create redundant heating systems that work together to maintain consistent temperatures even during the coldest months.
DIY Greenhouse Heating Comparison
Compost Heat Exchange: Low cost ($30-50), moderate effort, provides 90-140°F heat, lasts 2-3 months per batch
Solar Heat Sink: Medium cost ($50-80), low effort, provides 10-15°F above ambient, lasts indefinitely with maintenance
Bubble Wrap Insulation: Very low cost ($20-30), very low effort, reduces heat loss by 30-40%, lasts 1-2 seasons
Clay Pot Heaters: Low cost ($25-40), low effort, provides localized heat of 5-10°F, requires candle/fuel replacement
1. Compost Heat Exchange System
Decomposing organic material generates substantial heat that can be captured and utilized within your greenhouse. A properly constructed compost heap of 4’x4’x4′ can maintain internal temperatures of 130-160°F for 4-6 weeks, providing free heat while creating valuable garden amendments. The simplest approach places compost bins directly inside the greenhouse, allowing heat to radiate naturally into the growing space.
More sophisticated systems incorporate water pipes or air ducts through the compost pile, actively transferring heat to growing areas. A coil of 1″ polyethylene pipe embedded in the center of a large compost pile can heat several hundred gallons of water to 90-110°F, creating an excellent thermal reservoir. Regular turning and occasional material addition maintain bacterial activity and extend the heating cycle throughout winter.
For maximum effectiveness, use a mixture of high-nitrogen materials (manure, food scraps, fresh grass clippings) combined with carbon-rich components (leaves, straw, wood chips) at approximately a 1:3 ratio. Monitor moisture levels carefully—the materials should feel like a wrung-out sponge, damp but not soggy. Too much water reduces oxygen penetration and slows decomposition, while insufficient moisture prevents bacterial activity.
A single well-maintained compost pile can provide significant heat for 2-3 months during the coldest part of winter while simultaneously creating valuable growing medium for your spring planting. For more information on composting techniques, explore which compost style is right for you.
2. Solar Heat Sink with Recycled Materials
A solar heat sink stores daytime warmth and slowly releases it overnight, moderating temperature fluctuations in your greenhouse. The simplest version uses black-painted water-filled containers positioned to receive maximum sunlight during winter days. 55-gallon drums work exceptionally well, but recycled containers of any size can be effective when used in sufficient quantity.
For maximum efficiency, place these thermal mass containers along north-facing walls (in the Northern Hemisphere) where they’ll receive direct sunlight but won’t shade plants. Water’s excellent heat capacity means it warms slowly during the day and releases that heat gradually at night, precisely when your greenhouse needs it most. For small greenhouses, aim for water volume equal to at least 2-3 gallons per square foot of floor space to create meaningful temperature moderation.
3. Bubble Wrap Insulation Panels
Bubble wrap insulation offers remarkable insulating properties at minimal cost. The large-bubble variety (typically 3/4″ bubbles) provides the best insulation value while still allowing good light transmission. To create effective insulation panels, simply cut bubble wrap to fit your greenhouse panels and attach them using small clips, clothespins, or by misting the glass with water and pressing the bubble side against it. This simple solution creates a dead air space that significantly reduces heat loss through glazing, which is typically responsible for 70-80% of a greenhouse’s total heat loss. For maximum effectiveness, install these panels before the first frost and remove them once nighttime temperatures consistently remain above freezing.
4. Heat-Storing Clay Pot Heaters
Clay pot heaters create localized warmth using the principle of thermal mass combined with a small heat source. The traditional design uses nested terracotta pots with a small space between them, filled with sand or small stones. A tea light or small alcohol burner placed in the center generates heat that’s absorbed and radiated by the clay and filling material. While these won’t heat an entire greenhouse, strategic placement near cold-sensitive plants can prevent frost damage during temperature dips. For larger greenhouses, multiple units can be positioned throughout the space to create pockets of warmth where most needed. The terracotta’s natural properties allow it to absorb heat quickly and release it slowly, extending the warming effect well after the flame is extinguished.

Image from www.mantellritchie.com.
Heat Distribution Systems That Prevent Cold Spots
Even the most powerful heating system can fail if the warmth isn’t distributed effectively throughout your greenhouse. Cold pockets create microclimates where frost can damage plants despite adequate overall heating. Understanding airflow dynamics within your greenhouse structure is crucial for maintaining consistent temperatures throughout the growing space.
Temperature stratification presents a particular challenge in greenhouses, as warm air naturally rises while cold air sinks. Without intervention, this creates significant temperature differences between floor-level plants and those on higher shelves. In poorly designed systems, these variations can exceed 15°F between floor and ceiling during winter conditions.
Effective heat distribution requires a combination of properly sized circulation equipment, strategic placement of heat sources, and sometimes physical barriers or channels to direct airflow patterns. The goal is to create gentle, continuous air movement that evens out temperatures without creating damaging drafts or excessive air speed that can stress plants.
- Horizontal airflow fans create circular air patterns that prevent stratification
- Perforated poly-tubes distribute heated air evenly along plant rows
- Thermal screens can compartmentalize different temperature zones
- Raised growing beds allow air circulation beneath plant roots
- Angled reflective surfaces can redirect both heat and light to needed areas
When designing your distribution system, remember that different plant species have varying temperature requirements. Creating zones with slightly different temperature profiles allows for accommodating diverse crops within the same greenhouse structure – crucial for small-scale growers seeking to maximize productivity in limited space.
Circulation Fans: Placement and Size Guide
Circulation fans serve as the workhorses of heat distribution systems, creating the airflow patterns necessary for temperature consistency. For most home greenhouses, horizontal airflow (HAF) fans mounted above plant height provide the most effective air movement. As a general rule, calculate one 20″ diameter fan per 2,000 cubic feet of greenhouse volume, with smaller greenhouses requiring proportionally sized fans to prevent excessive air velocity. Position fans to create a circular airflow pattern, with air moving in one direction around the perimeter of the structure. Stagger multiple fans along the length of larger greenhouses, ensuring each pushes air in the same directional flow to prevent counterproductive air currents that can create dead spots or excessive turbulence.

Image from solarinnovations.com.
- Small greenhouses (under 200 sq ft): 8-12″ oscillating fans, 1 per 100 sq ft
- Medium greenhouses (200-500 sq ft): 16-20″ HAF fans, placed every 15-20 feet
- Large greenhouses (over 500 sq ft): Multiple 20-24″ HAF fans in staggered arrangement
- Height placement: 7-8 feet above floor, angled slightly downward
- Operational timing: Continuous operation during heating periods for best results
Underground Heat Distribution Pipes
Underground heat distribution pipes represent one of the most efficient methods for delivering warmth directly to plant root zones where it provides maximum benefit. This system works by burying perforated pipes or solid pipes with intermittent openings approximately 12-18 inches below the greenhouse floor. Warm air forced through these pipes heats the surrounding soil, creating a reservoir of thermal mass that radiates heat upward through root zones. The soil temperature remains more stable than air temperature, reducing stress on plants and creating more favorable growing conditions. For small greenhouses, simple 4″ corrugated drainage pipe can be used, while larger installations may require more sophisticated PEX tubing or dedicated hydronic systems that circulate warm water rather than air.
Zone Heating for Plant-Specific Needs
Zone heating divides your greenhouse into distinct temperature regions, allowing you to grow plants with different climate requirements in the same structure while minimizing overall heating costs. The concept involves concentrating heat sources near plants that need warmer conditions while allowing other areas to remain cooler for cold-tolerant species. Propagation benches with soil heating cables maintain perfect germination temperatures without wasting energy heating the entire greenhouse to the same high temperature. Electric heating mats under seed trays provide precise bottom heat that encourages rapid germination and strong root development while overhead areas remain cooler. Thermal curtains or plastic dividers can physically separate zones, creating temperature differences of 5-10°F between adjacent areas with minimal energy input.
This approach particularly benefits mixed-crop greenhouses where some plants require cool conditions (like lettuce or spinach at 45-60°F) while others need significantly warmer environments (like tomato seedlings at 70-80°F). By matching heating intensity to specific plant needs, you can reduce overall energy consumption by 30-40% compared to heating the entire structure to accommodate your most heat-demanding plants.
Energy-Efficient Control Systems Worth The Investment
Implementing advanced control systems might seem like an unnecessary expense for hobby greenhouses, but they often pay for themselves within a single winter season. Modern greenhouse controllers bring precision to temperature management that manual methods simply cannot match, resulting in healthier plants and significant energy savings.
The ideal control system monitors multiple environmental factors simultaneously, adjusting heating, ventilation, and other components in response to changing conditions. This holistic approach prevents the wasteful temperature swings common in manually controlled systems, where overheating frequently alternates with rapid cooling cycles that stress plants and consume excess energy.
Thermostats and Temperature Sensors
Digital thermostats with high-low temperature settings represent the minimum control technology for any heated greenhouse. Unlike basic household thermostats, greenhouse-specific models typically feature differential settings that prevent short-cycling of heating equipment, extending system lifespan and reducing energy consumption. For optimal temperature monitoring, install multiple sensors at different heights and locations, as temperature can vary by 5-15°F between floor level and upper shelving during winter operation. Wireless sensor networks allow for precise temperature mapping throughout your greenhouse, identifying problematic cold spots that might otherwise go undetected until plant damage occurs.
When selecting temperature sensors, opt for shielded models that measure ambient air temperature without being influenced by direct sunlight. Position sensors at plant level rather than ceiling height to ensure you’re monitoring the actual growing environment rather than the warmest air that has stratified near the roof. Some advanced systems now incorporate soil temperature probes as well, allowing for comprehensive monitoring of both air and root zone conditions.
Automated Venting Systems
Even in winter, greenhouses frequently need ventilation during sunny days when temperatures can rise quickly despite cold outside conditions. Automated vent openers use temperature-sensitive pistons or electric motors to provide precisely controlled airflow without human intervention. These systems prevent the dangerous temperature spikes that can occur when manual vents remain closed during winter sunny periods, while also ensuring vents close promptly as temperatures fall. For passive solar greenhouses in particular, automated venting systems are essential for preventing the midday overheating that can stress plants and waste accumulated heat.

Image from canopia.com.
Integration of venting controls with heating systems prevents the counterproductive operation of both systems simultaneously, which wastes energy and creates unstable growing conditions. When outdoor temperatures permit, sophisticated controllers will prioritize ventilation for temperature moderation before activating heating systems, maximizing free solar gain and minimizing fuel consumption. For more tips on maintaining optimal greenhouse conditions, check out this article on how to keep a greenhouse warm in winter.
Smart Controllers and Remote Monitoring
The latest generation of greenhouse controllers brings IoT technology to winter growing, allowing remote monitoring and adjustment via smartphone apps or web interfaces. These systems alert growers to problematic conditions before plants suffer damage, providing peace of mind during extreme weather events or power outages. Beyond simple alerts, advanced controllers can manage complex environmental parameters including humidity, light levels, soil moisture, and carbon dioxide concentration – all factors that influence heating efficiency and plant health during winter production.
Remote monitoring capabilities prove particularly valuable during weather extremes when greenhouse visits might be difficult or dangerous. The ability to verify heating system operation, adjust temperature settings, or activate backup systems from anywhere provides insurance against catastrophic crop losses during winter storms. For commercial growers, these systems often integrate with predictive analytics that optimize heating schedules based on weather forecasts, crop development stage, and energy costs – sometimes reducing heating expenses by 15-25%.
Cold-Weather Greenhouse Layout Strategies
The internal arrangement of your greenhouse significantly impacts heating efficiency and plant health during winter. Thoughtful layout design maximizes natural heat distribution while minimizing energy consumption, creating microclimates that suit different plant needs without requiring separate heating systems.
Winter layouts often differ substantially from summer arrangements, prioritizing heat retention over ventilation concerns. Rearranging growing benches, shelving, and plant groupings seasonally allows you to optimize for each growing season’s specific challenges.
Proper Plant Positioning for Temperature Management
Strategic plant placement creates natural temperature zones that match plant requirements without additional heating infrastructure. Position cold-hardy plants like kale, spinach and root vegetables along outer walls or in corners where temperatures naturally run cooler, reserving center spaces and areas near heat sources for heat-loving crops like peppers and tropical ornamentals. Hanging baskets should be lowered during winter months to bring plants out of the warmer air stratified near the ceiling into more moderate temperature zones. Clustering container plants together creates a microclimate effect where the collective mass moderates temperature fluctuations and shared humidity benefits all plants in the grouping.
Remember that night temperatures typically drop most severely along exterior walls, especially on the north side of the greenhouse (in northern hemisphere locations). This temperature gradient can exceed 10°F from the center of the structure to exterior walls during extreme cold, making these placement decisions crucial for sensitive specimens.
Creating Microclimate Zones
Interior barriers such as row covers, plastic sheeting, or horticultural fleece allow you to create distinct climate zones within a single greenhouse structure. These dividers can be temporary or permanent depending on your growing program and can reduce heating costs significantly by containing warmth around temperature-sensitive crops. A propagation area enclosed with clear plastic sheeting and equipped with a small space heater or heating mats can maintain germination temperatures 15-20°F above the main greenhouse ambient temperature, allowing seed starting even during the coldest months without heating the entire structure.

Image from www.tunnelvisionhoops.com.
Vertical growing systems like wall-mounted planters or trellises position plants to take advantage of natural temperature stratification, with heat-loving climbers extending into warmer upper air while cool-season crops remain in the cooler lower zones. This three-dimensional growing approach maximizes production space while working with, rather than against, the greenhouse’s natural temperature patterns.
Bench and Shelving Arrangements
Winter bench arrangements should prioritize air circulation beneath and between growing surfaces to prevent cold pockets where frost can form. Raised benches with open grating or mesh tops allow warm air to reach plant root zones, preventing the root chill that can halt growth even when ambient air temperatures seem adequate. Solid-top benches, while providing less circulation, offer opportunities for under-bench heating systems that deliver warmth directly to root zones – often the most efficient method of maintaining plant health with minimal energy input.
Step or stadium-style shelving arrangements along south-facing walls (in northern hemisphere locations) maximize light exposure during short winter days while creating natural vertical temperature gradients that can be matched to different plant needs. This approach is particularly valuable for operations growing diverse crops with varying temperature requirements, as it uses the greenhouse’s natural physics to create appropriate conditions rather than fighting against them.
Calculating Your Greenhouse Heating Requirements
Determining your exact heating needs prevents both costly overheating and dangerous temperature drops during cold spells. A precise calculation considers your greenhouse’s unique characteristics and your specific climate challenges. Proper sizing ensures your heating system operates efficiently without unnecessary energy consumption or inadequate performance during extreme weather.
While many gardeners rely on general rules of thumb (like 10 watts of electric heat per square foot), a more accurate approach accounts for your greenhouse’s specific construction, desired temperature differential, and local climate data. Taking time to perform these calculations pays dividends in both plant health and utility costs throughout the winter growing season.
Heat Loss Factors in Different Greenhouse Structures
Your greenhouse’s construction materials dramatically impact heat retention capabilities. Single-layer glass loses heat roughly twice as quickly as double-wall polycarbonate, while polyethylene film falls between these extremes. Structural elements like metal frames conduct heat away from the interior more rapidly than wooden frameworks. Advanced glazing technologies like low-E glass can reduce heat loss by 30-40% compared to standard horticultural glass, though at significantly higher initial cost.

Image from amerlifehome.com.
BTU Requirements Based on Size and Climate
The basic formula for calculating heating requirements multiplies your greenhouse’s surface area by the desired temperature differential (indoor target minus outdoor minimum) and a heat loss factor specific to your covering material. For example, a 10’x12′ greenhouse with 240 square feet of polycarbonate surface area, maintaining a 30°F temperature differential in an area using double-wall polycarbonate (factor of 0.7) would require approximately 5,040 BTUs per hour (240 × 30 × 0.7 = 5,040). Always add a 10-15% safety margin to account for unexpected weather events or system inefficiencies.
Heating Cost Comparisons Across Fuel Types
| Fuel Type | BTU Output per Unit | Typical Efficiency | Average Cost per Million BTU | Environmental Considerations |
|---|---|---|---|---|
| Natural Gas | 100,000 BTU/therm | 80-95% | $10-15 | Lower emissions than oil/propane, but still a fossil fuel |
| Propane | 91,500 BTU/gallon | 80-95% | $15-25 | Portable, relatively clean-burning fossil fuel |
| Electricity | 3,412 BTU/kWh | 100% | $25-40 | Clean at point of use, environmental impact depends on generation source |
| Heating Oil | 138,500 BTU/gallon | 80-90% | $18-28 | Higher emissions, requires storage tank |
| Firewood (Hardwood) | 22 million BTU/cord | 45-75% | $12-20 | Renewable but produces particulate emissions, labor-intensive |
| Wood Pellets | 16.5 million BTU/ton | 75-85% | $15-22 | Renewable, cleaner burning than cordwood, requires electricity for auger |
Actual costs vary significantly by region and fluctuate seasonally. Rural areas often see higher electricity rates but may have access to lower-cost biomass fuels. Urban greenhouse owners typically benefit from natural gas availability, which often provides the lowest operational cost in cold climates. The table above provides national averages, but checking current local rates provides more accurate projections for your specific situation.
Consider the intersection between initial equipment cost and long-term operational expenses. Electric heaters offer the lowest upfront investment but often the highest ongoing costs. Geothermal systems invert this equation with substantial installation expenses offset by minimal operating costs. For most hobby greenhouse gardeners, the payback period for premium heating systems ranges from 3-7 years, depending on usage intensity and local energy prices.
Environmental considerations increasingly influence heating choices, with many gardeners seeking to minimize their carbon footprint. Electric heating powered by renewable sources offers the lowest environmental impact but requires careful planning and potentially significant infrastructure investment. Biomass options like wood pellets provide a middle ground, offering renewable heating with moderate emissions and reasonable costs.
For the most accurate cost projection, maintain a heating log during your first winter season. Document outdoor temperatures, heater run times, and fuel consumption to create a personalized heating profile that accounts for your specific greenhouse characteristics and management practices. This data proves invaluable for refining your approach in subsequent seasons.
Seasonal Maintenance Tasks for Heating Systems
Preventative maintenance significantly extends equipment life while ensuring optimal performance when you need it most. Heating system failures typically occur during the coldest weather when components face maximum stress. Regular inspection and maintenance identify potential problems before they cause catastrophic failures and expensive plant losses.
Create a maintenance calendar that schedules specific tasks at appropriate intervals throughout the year. Digital reminder systems help ensure critical maintenance doesn’t slip through the cracks during busy growing periods. Documenting all maintenance activities creates a valuable reference for troubleshooting and planning future equipment upgrades.
- Clean or replace filters monthly during the heating season to maintain airflow and efficiency
- Inspect fuel lines, connections, and safety systems before each heating season begins
- Remove dust and debris from heating elements, fans, and thermostatic controls quarterly
- Test backup heating systems under load conditions before extreme weather arrives
- Calibrate thermostats and controllers annually using a reliable reference thermometer
- Examine thermal mass components for leaks, cracks, or contamination twice yearly
Keep essential spare parts on hand for critical components, particularly those with known wear patterns or vulnerability to failure. Circulation fan motors, thermostatic controls, and ignition components top the list of parts that commonly fail during peak heating season. Having replacements readily available can prevent disastrous temperature drops during repair delays.
Consider establishing a relationship with a qualified service technician who specializes in greenhouse or agricultural heating systems. Professional inspection before each heating season identifies potential problems that might escape notice during routine maintenance. The cost of annual professional service typically pays for itself through improved efficiency and reduced emergency repair expenses.
Fall Preparation Checklist
Fall maintenance focuses on ensuring all systems function properly before dependence on heating becomes critical. Start by thoroughly cleaning heating units, removing dust, debris, and any pest nests that may have accumulated during the off-season. For combustion systems, inspect chimney and exhaust paths for blockages or damage that could lead to dangerous backdrafting of carbon monoxide. Check all electrical connections for corrosion or damage, particularly in the humid greenhouse environment that accelerates deterioration.
Test all heating systems under load conditions when outdoor temperatures remain moderate enough that plants won’t suffer if problems emerge. Run each system for several hours while monitoring performance, checking for unusual sounds, odors, or operational inconsistencies. For fuel-based systems, ensure adequate supplies are secured before seasonal price increases, and verify that delivery access remains clear even under potential snow accumulation.
Image from abundantpermaculture.com.
Mid-Winter Inspection Points
During the heating season, focus maintenance efforts on components subject to continuous stress. Circulating fans require special attention as they typically operate constantly during winter months. Listen for bearing noise that indicates impending failure, and check amperage draw against manufacturer specifications to identify motors struggling under excessive load. Clean fan blades monthly as even minor dust accumulation reduces efficiency while increasing power consumption.
Monitor fuel consumption patterns against outdoor temperature data to spot efficiency decreases that might indicate developing problems. Sudden increases in fuel usage without corresponding temperature drops often signal system issues requiring attention. For electric systems, inspect heating elements for signs of corrosion or damage, particularly near connection points where moisture tends to accumulate. Check all safety systems weekly, including tip-over protection, oxygen depletion sensors, and high-temperature cutoffs.
Spring Shutdown Procedures
As heating requirements diminish, proper system shutdown prevents deterioration during the off-season while preparing for easy restart in fall. Clean all components thoroughly, removing season-long accumulations of dust and corrosive residues. For fuel-based systems, consider draining supply lines or adding fuel stabilizer to prevent gumming and contamination during summer months. Document any operational concerns noticed during the heating season, creating a repair list that can be addressed during favorable weather before the next heating cycle begins.
Plant Your Success with the Right Heating Approach
Creating an effective greenhouse heating strategy combines science, economics, and an understanding of your specific growing goals. The most successful approaches layer multiple heating methods that complement each other while providing redundancy during extreme weather events. Start with maximizing passive solar gain and heat retention through proper design and insulation, then supplement with appropriate active heating sized correctly for your climate challenges. Remember that consistent, moderate temperatures typically produce better plant results than fluctuating conditions, even when those fluctuations include periods of “ideal” temperatures. Your greenhouse heating system represents one of your most significant investments in growing success—choose wisely, maintain diligently, and enjoy the rewards of year-round growing that a properly heated greenhouse provides.

Image from www.ankersolix.com.
Frequently Asked Questions
The following questions represent the most common concerns greenhouse gardeners express when planning their winter heating strategies. Understanding these fundamental aspects of greenhouse heating helps you avoid costly mistakes while creating optimal growing conditions throughout the coldest months.
How much does it cost to heat a greenhouse in winter?
Heating costs vary dramatically based on greenhouse size, insulation quality, local climate, and desired indoor temperature. For a well-insulated 8’x12′ hobby greenhouse maintained at 50°F in a region with winter lows around 20°F, expect monthly heating costs ranging from $75-150 using electric heat, $50-100 using natural gas, or $60-120 using propane. These estimates assume proper insulation techniques like double-wall construction and night curtains.
Implementing comprehensive passive heating strategies can reduce these costs by 30-60% in most climate zones. Each 5°F reduction in your target temperature typically reduces heating costs by 15-20%, making crop selection an important economic consideration. For commercial greenhouses, heating often represents 20-30% of total production costs, making efficiency improvements particularly valuable at scale.
Can I grow vegetables year-round with a heated greenhouse?
Absolutely! A properly heated greenhouse enables year-round vegetable production even in severe northern climates. Cold-tolerant crops like kale, spinach, and carrots require minimal supplemental heat, often thriving with nighttime temperatures as low as 40°F. Heat-loving crops such as tomatoes, peppers, and cucumbers need warmer conditions (minimum 55-60°F) but can produce abundantly with adequate heating and supplemental lighting during short winter days.
Consider creating temperature zones within your greenhouse to maximize efficiency, placing heat-loving crops in the warmest areas while grouping cold-tolerant varieties in cooler sections. This approach allows you to maintain ideal conditions for each plant type while minimizing overall heating requirements. Succession planting becomes particularly important during winter months, as slower growth rates require starting replacements well before existing crops finish producing.
What’s the minimum temperature my greenhouse should maintain?
Minimum acceptable temperatures depend entirely on what you’re growing. Cold-hardy vegetables like spinach and mâche can survive brief periods near or just below freezing, while tropical plants require temperatures consistently above 50°F to prevent damage. For a mixed greenhouse, maintaining minimum night temperatures of 45-50°F provides a good compromise that protects most plants while keeping heating costs reasonable. During daylight hours, aim for temperatures 10-15°F higher to promote active growth and photosynthesis.
How do I prevent condensation problems in a heated greenhouse?
Condensation occurs when warm, moisture-laden air contacts cold surfaces, particularly greenhouse covering materials. This moisture creates ideal conditions for fungal diseases while reducing light transmission. The key to controlling condensation lies in maintaining proper air circulation and managing the temperature differential between plant areas and covering surfaces. Circulating fans running continuously (even at low speeds) prevent the stratification that leads to condensation pockets.
Anti-condensation coverings with special surfactants help water sheet off rather than forming droplets that fall onto plants. For existing structures, applying these products to interior surfaces reduces dripping significantly. Proper ventilation, even during cold weather, removes excess humidity while introducing drier outdoor air. Aim for relative humidity between 60-80%—low enough to minimize disease pressure but high enough to prevent excessive plant transpiration.
- Water plants in the morning so foliage dries before evening temperature drops
- Maintain continuous air movement with properly sized circulation fans
- Install horizontal airflow fans that move air parallel to the greenhouse covering
- Consider a dehumidifier for severe condensation issues in smaller structures
- Apply anti-condensation films or sprays to interior greenhouse surfaces
Thermal screens or energy curtains serve dual purposes by reducing heat loss while creating a barrier that keeps warm, moist air away from cold covering surfaces. Deploy these systems before sunset and retract after sunrise to maximize their condensation-preventing benefits. For budget-conscious gardeners, lightweight row covers draped over plants at night provide similar benefits on a smaller scale.
Remember that some condensation is inevitable in winter greenhouse operation. The goal isn’t elimination but management to prevent dripping onto plants and excessive humidity that promotes disease. Proper spacing between plants improves air circulation around foliage, further reducing condensation-related problems.
Are there plants that thrive in cooler greenhouse temperatures?
Many valuable crops actually prefer cooler greenhouse conditions, making them ideal choices for minimizing winter heating costs. Leafy greens like spinach, kale, and Asian greens often develop sweeter flavors and crisper texture when grown in temperatures between 40-60°F. Root vegetables including carrots, beets, and turnips continue developing underground even when top growth slows in cool conditions. Many herbs such as cilantro, parsley, and dill actually produce better in cooler temperatures, with less bolting and more flavorful foliage.
Cool-season flowers offer another excellent option for winter greenhouse production. Snapdragons, calendula, and pansies thrive in temperatures from 45-60°F, providing cut flowers or transplants when outdoor production is impossible. Many spring flowering bulbs like tulips and daffodils can be forced in cool greenhouse conditions, providing early blooms and extending your cutting season.
Featured Image from growingspaces.com.

Related Posts
-
 [Video] How to Use Microclimates For A More Productive Garden
- How & Why To Include Mustard Greens In Your Fall Garden!
- Year-Round Gardening Tips, Strategies & Solutions
- [Video] Why Everything You Know About Composting Is Wrong
- [Video] How to Have An Abundant Garden In Late October
- 5 Easy Ways to Keep Your Greenhouse Warm in the Winter


